The Pizza Theme delivers a fully integrated digital experience that combines modern design with seamless usability. It enables customers to customize their pizza in an interactive and professional way — starting from selecting the size and crust type, all the way to the finest topping and flavor details. The theme has been developed to provide a dynamic and visually engaging interface that reflects the identity of modern brands, while offering a smooth user experience that enhances customer interaction and increases order conversion rates. It also features professional visual presentation of customizations and pricing in real time, alongside smart option organization that simplifies the ordering process and gives customers complete control over their experience.
The Pizza Theme is an ideal solution for pizza restaurants and brands seeking to deliver an advanced online ordering experience that combines speed, flexibility, and strong visual appeal.
The Pizza Theme is an ideal solution for pizza restaurants and brands seeking to deliver an advanced online ordering experience that combines speed, flexibility, and strong visual appeal.
How to Set Up the Pizza Theme
Main Product Components
• Size : Includes the pizza sizes that will be added as variant products under the main product, while crust types
will be configured as modifiers within each size variation.
• Toppings : Includes toppings added as variant products with quantity options and layout display settings.
• Toppings : Includes toppings added as variant products with quantity options and layout display settings.
-
Size : Displays pizza sizes interactively by visually changing the tray or pizza appearance according to the selected size.
-
Crust : Displays crust or dough edge styles visually to clearly present the selected crust type inside the product.
-
Toppings : Displays selected toppings directly on the pizza interactively to
-
Side Toppings : Allows customers to choose the topping placement (left side, right side, or whole pizza) with a visual representation showing topping distribution on the pizza.The most important layouts are:
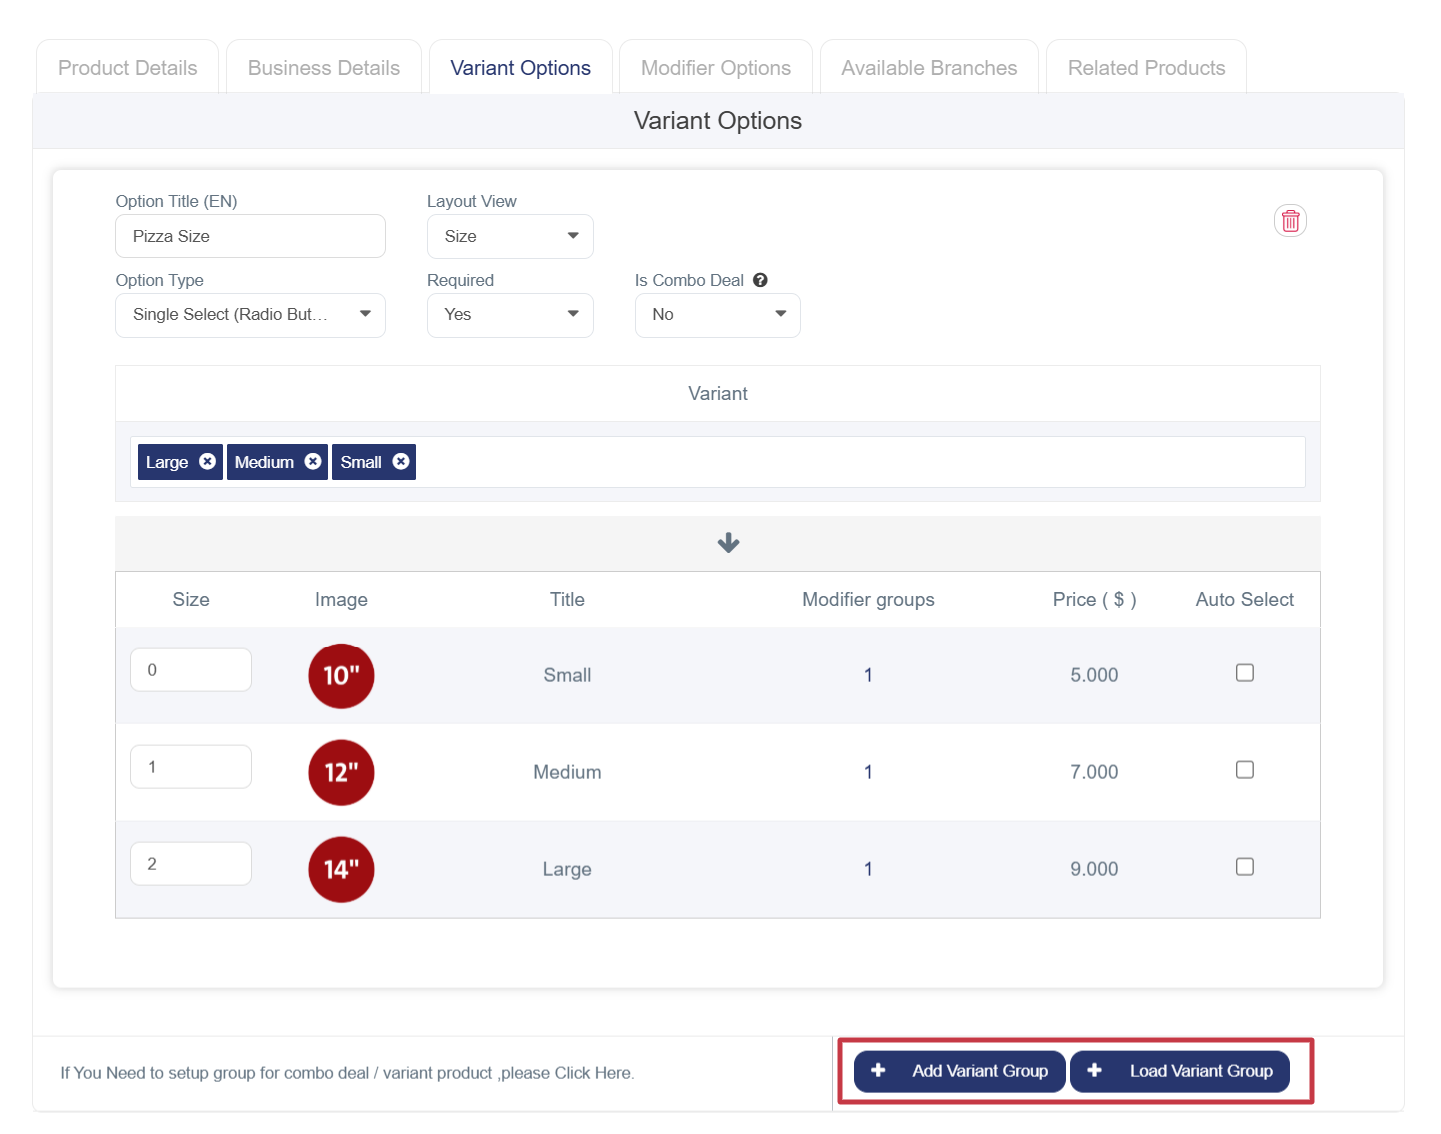
How to Create Sizes with Nested Crust Options Inside Each Size
• From the side menu, click Products.
• A submenu will appear; select Variants.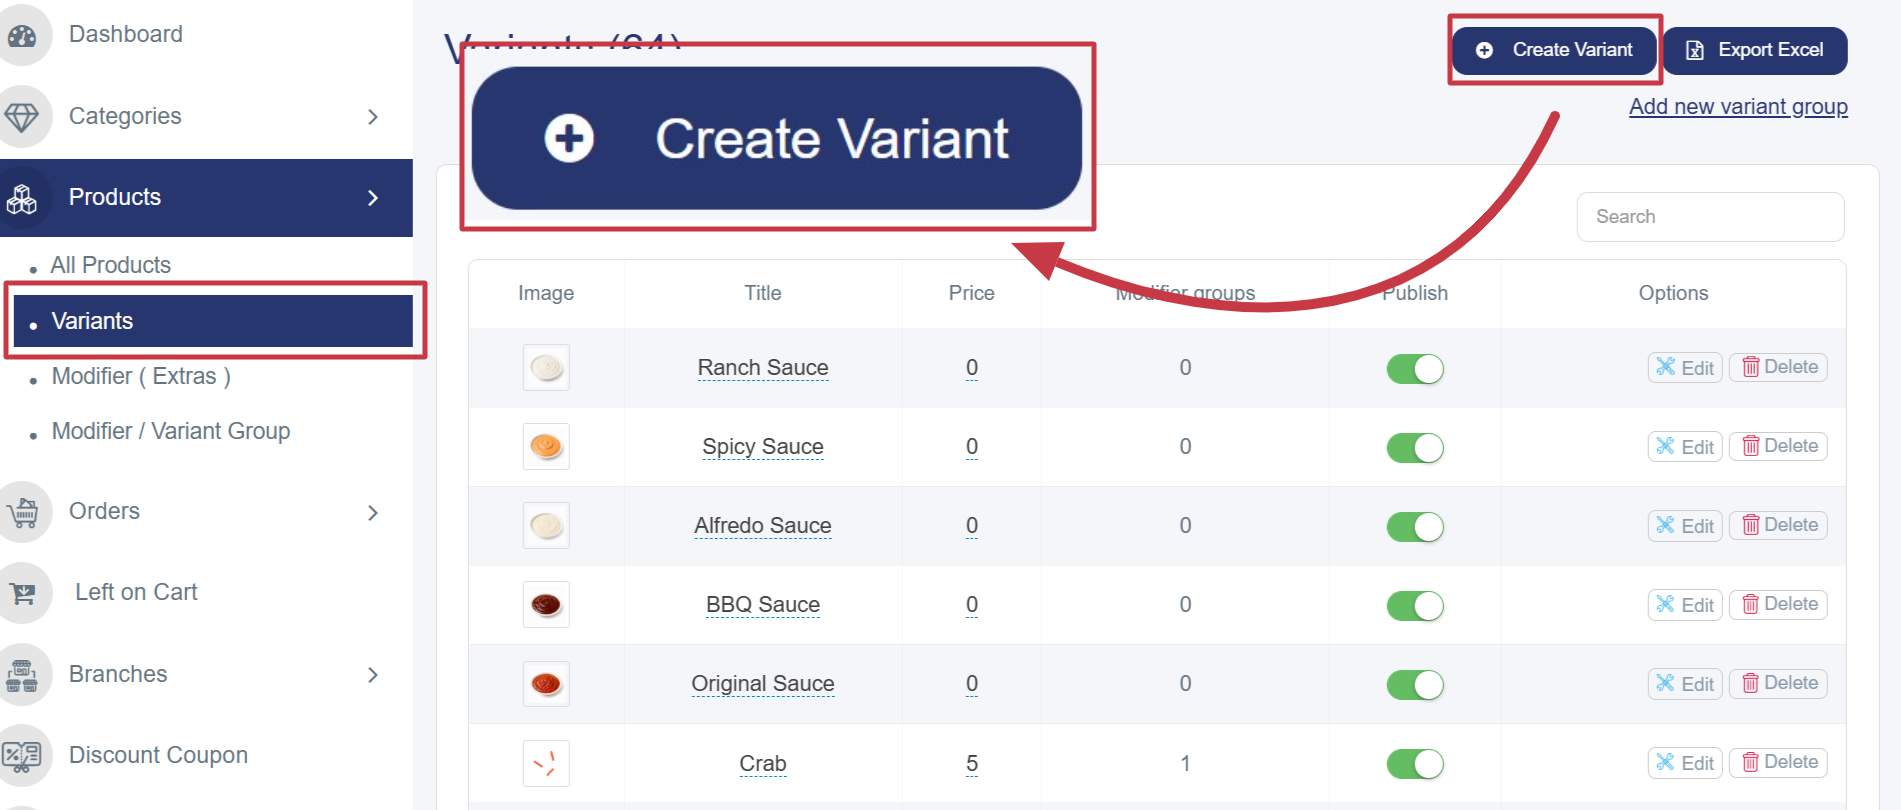
• After opening the Variants section, follow these steps:
• Fill in Product Details (Sizes)
• Product Name: Enter the product name in English (Small, Medium, Large).
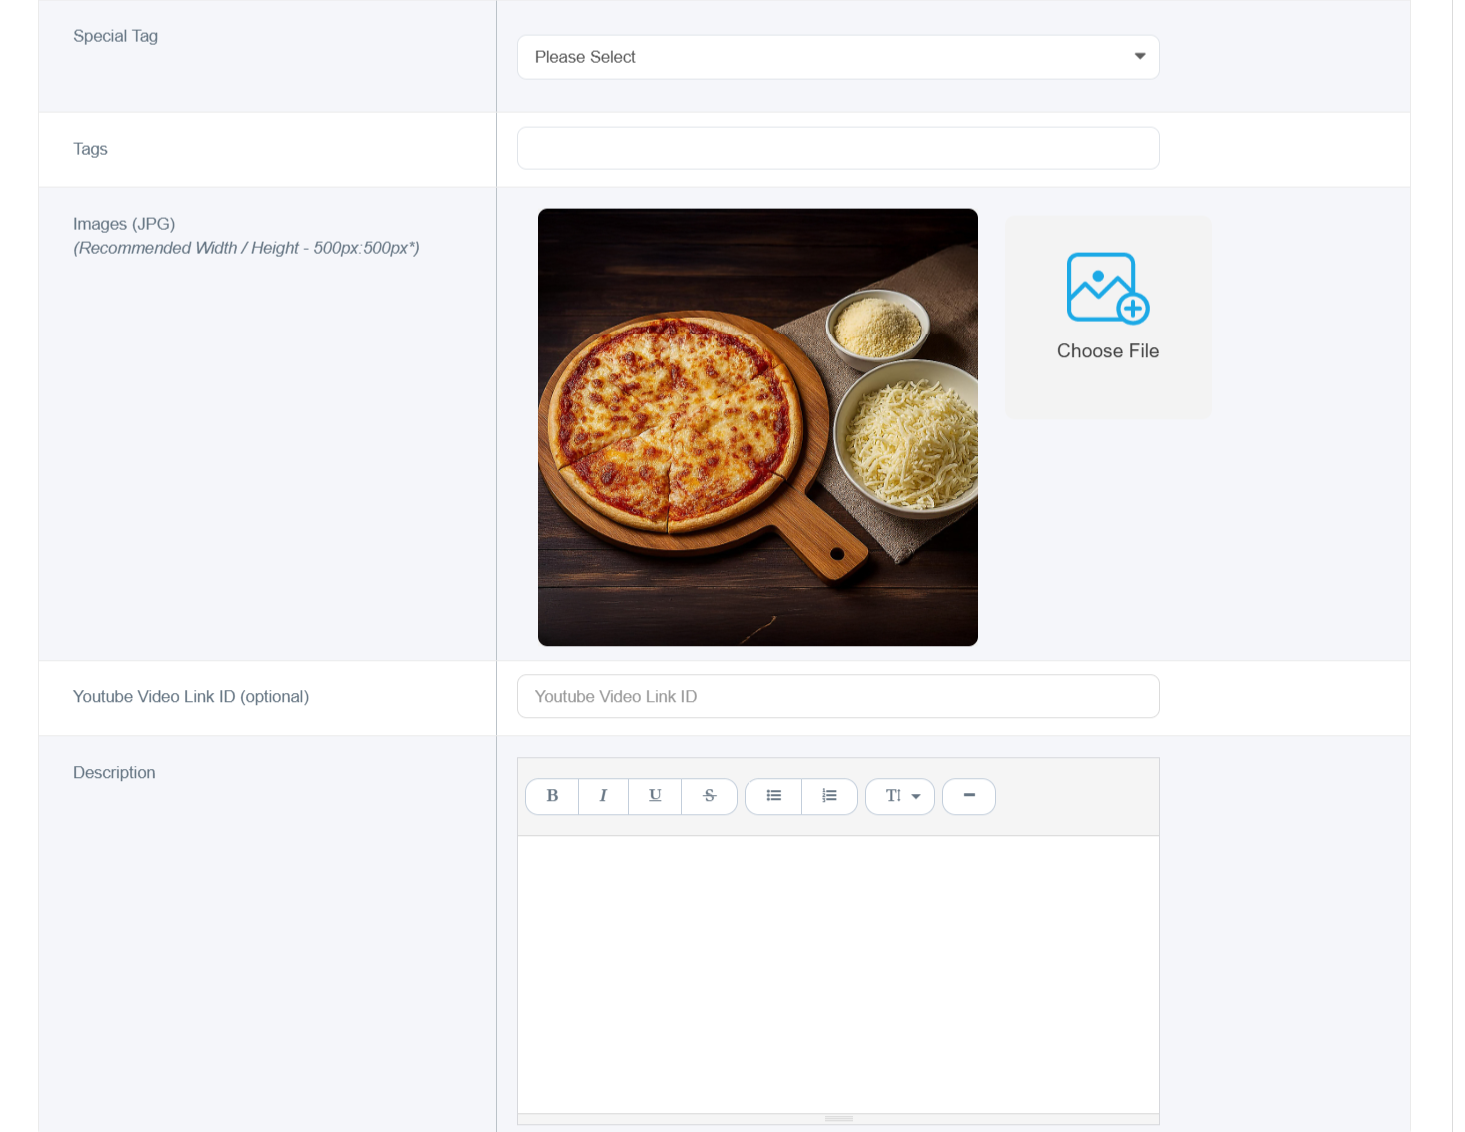
• Images (JPG/PNG): Upload the product image by clicking “Choose File”. Recommended dimensions:
• A submenu will appear; select Variants.
• After opening the Variants section, follow these steps:
• Fill in Product Details (Sizes)
• Product Name: Enter the product name in English (Small, Medium, Large).
• Images (JPG/PNG): Upload the product image by clicking “Choose File”. Recommended dimensions:
500×500 px.
• Show Image in Product Details: This option must be enabled to allow the product image to change dynamically
• Show Image in Product Details: This option must be enabled to allow the product image to change dynamically
based on the customer’s selected option.
• Description: Add a detailed product description in both languages.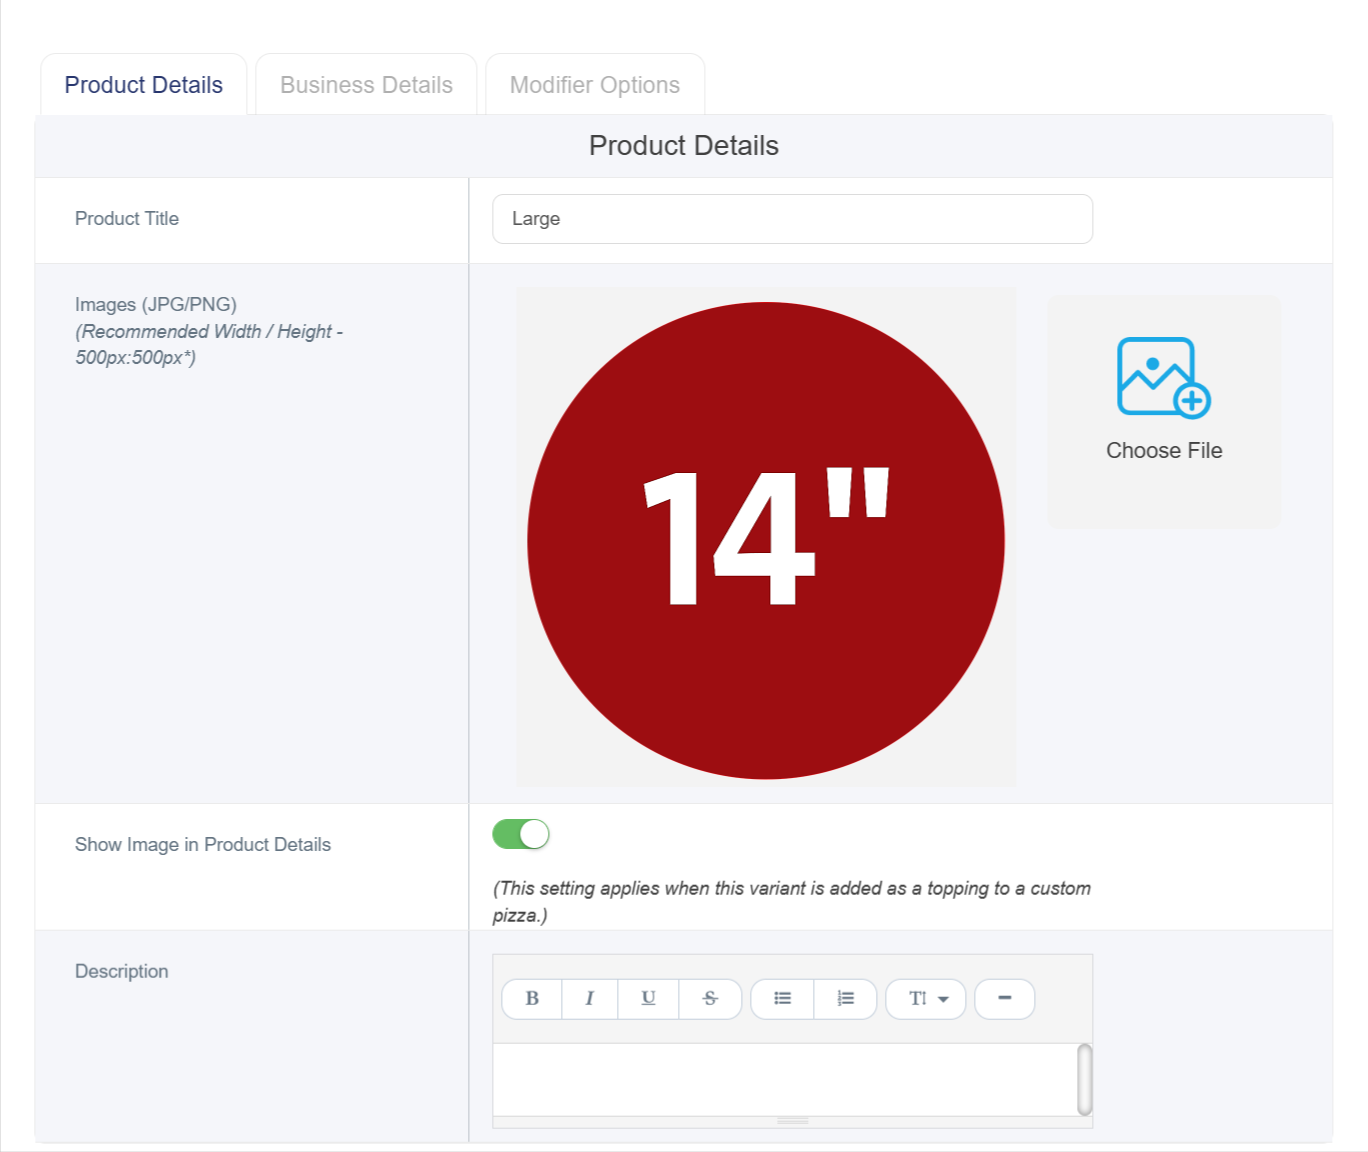
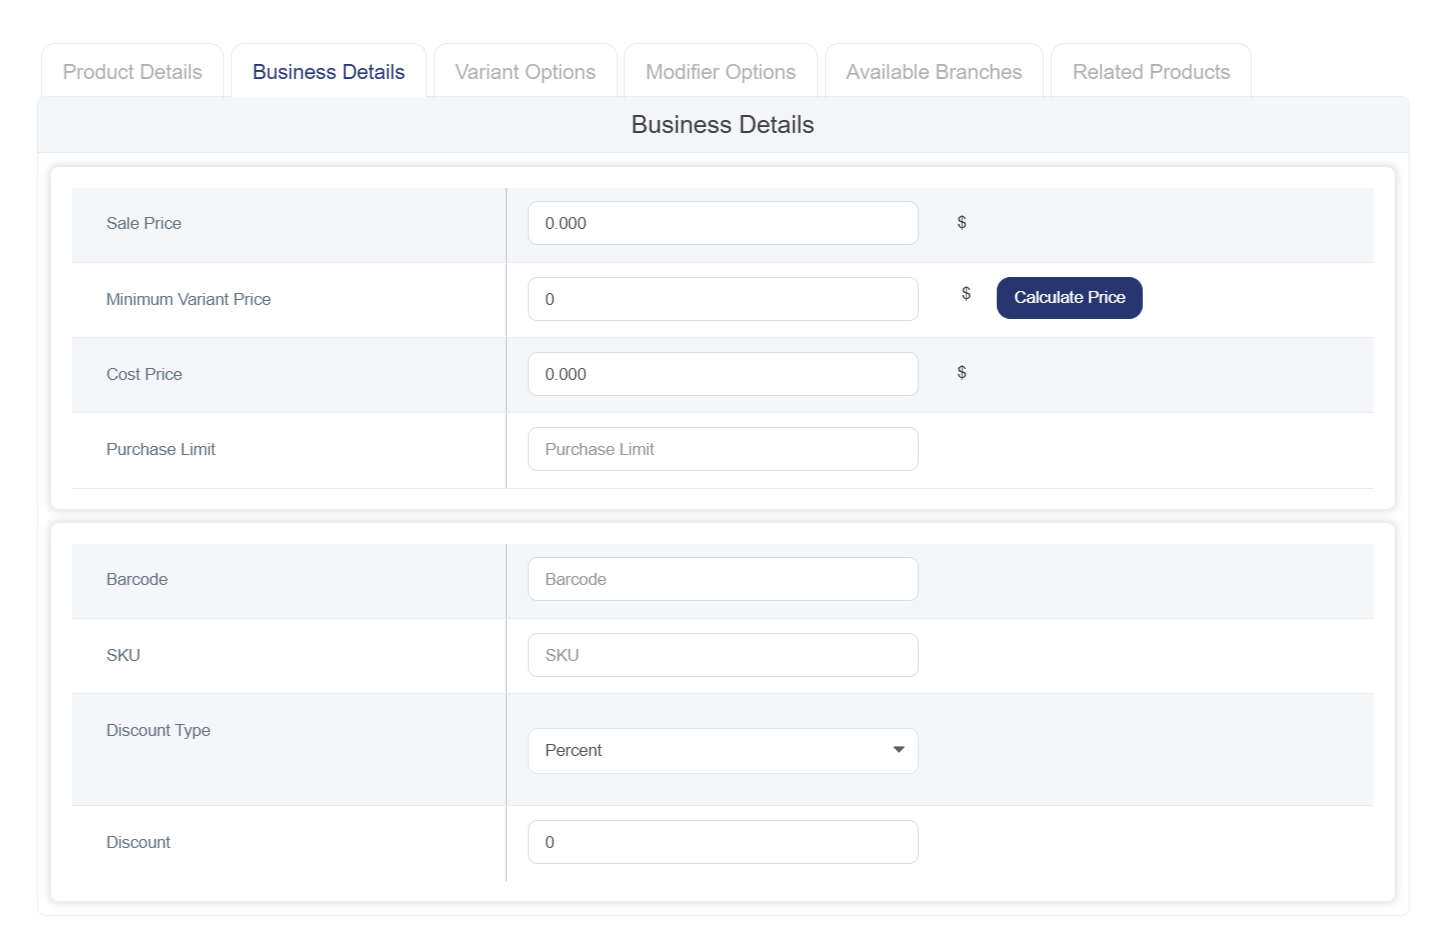
• Fill in Business details Enter the sale price and cost if available.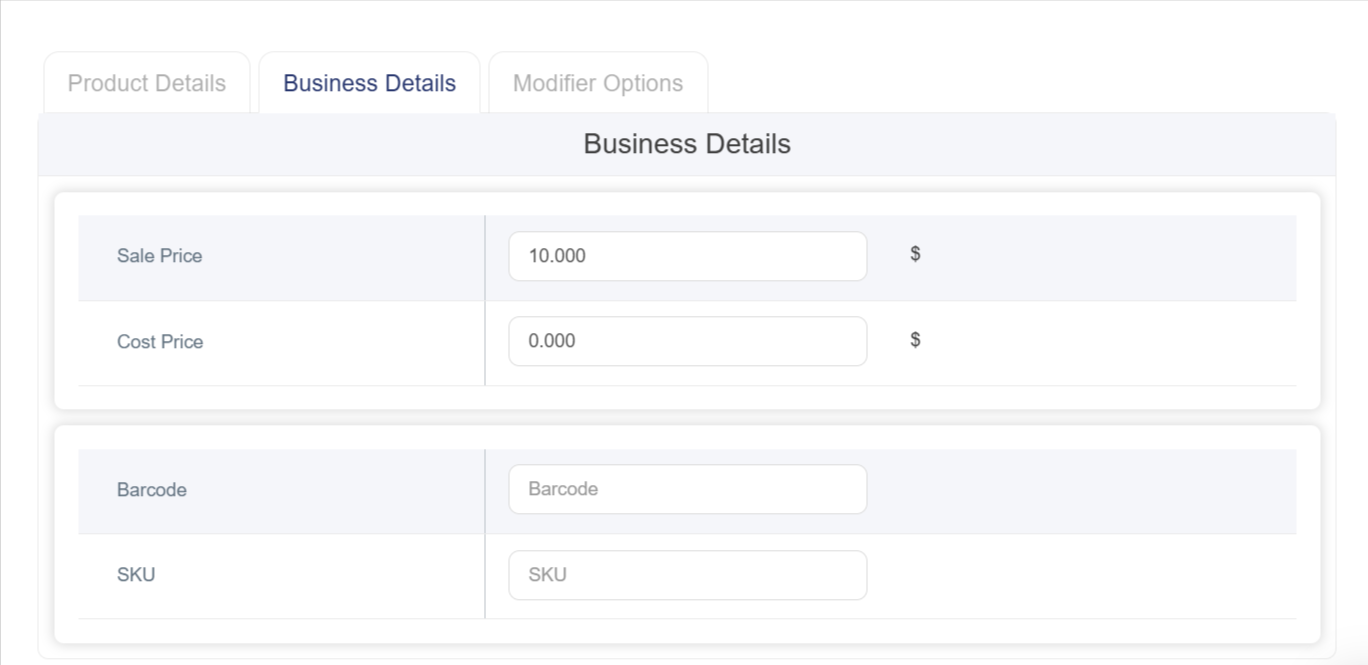
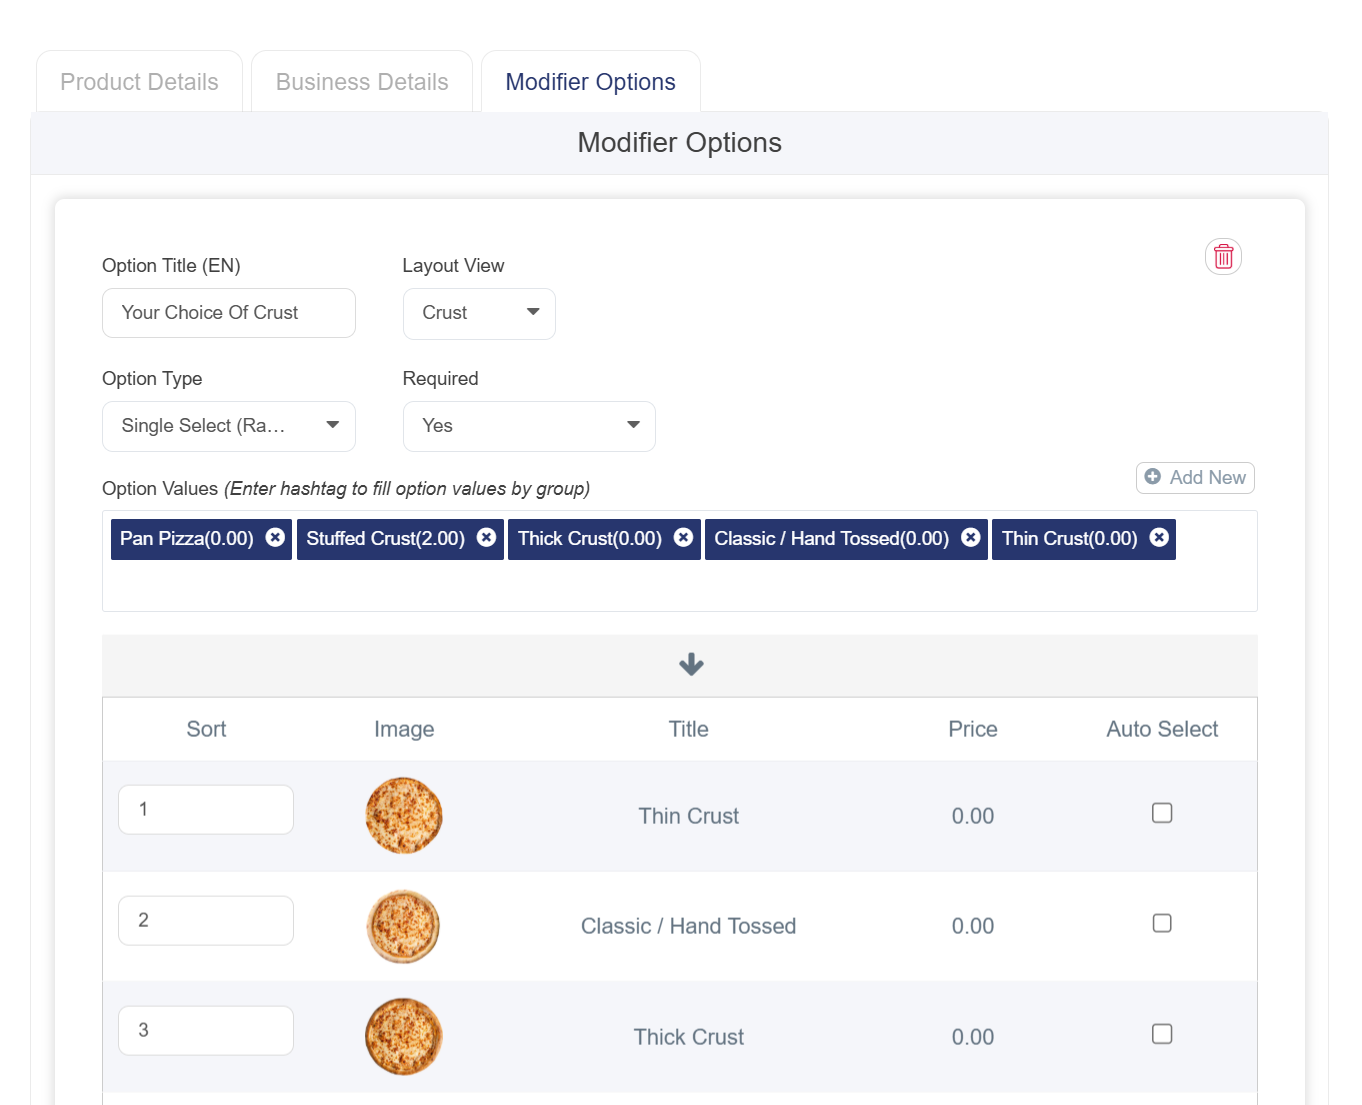
• Go to Modifier Options to Add Dough/Crust Types
• Additional Option Title (EN ): Enter the option name (Example: “Choose Your Dough”).
• Additional Option Type: Select Single Choice for crust selection.
• Display Layout: Select Crust Layout to visually display the selected crust type within the product.
• To Add Dough Types as modifiers for Sizes Click Add above the search box and complete the following:
1. Dough name in English.
2. Group Name (Optional): Use the (#) symbol to group similar add-ons (Example: #Dough).
3. Image: Upload images that change dynamically based on the selected option.
4. Status: Enable or disable the add-on using the toggle button.
5. Price: Enter the add-on price or leave it as “0” if there is no extra charge.
6. Barcode / SKU (Optional): Add tracking or inventory codes if available.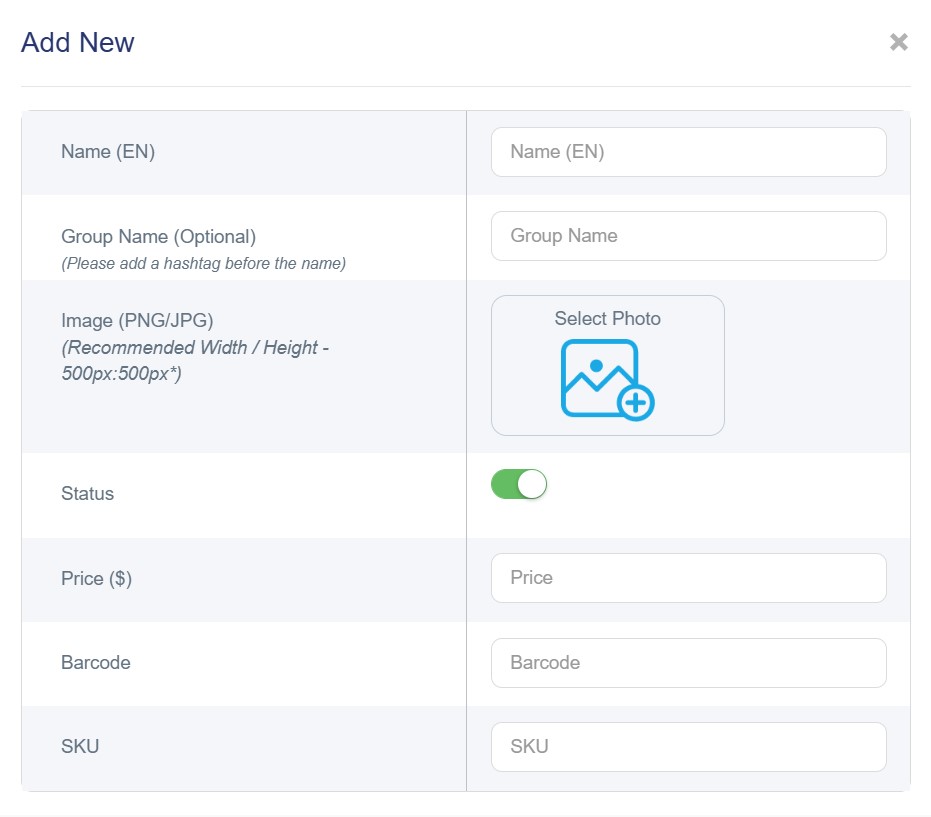
7. Click Save.
Note: The above steps must be repeated for each size as a separate sub-product.
• Description: Add a detailed product description in both languages.
• Fill in Business details Enter the sale price and cost if available.
• Go to Modifier Options to Add Dough/Crust Types
• Additional Option Title (EN ): Enter the option name (Example: “Choose Your Dough”).
• Additional Option Type: Select Single Choice for crust selection.
• Display Layout: Select Crust Layout to visually display the selected crust type within the product.
• To Add Dough Types as modifiers for Sizes Click Add above the search box and complete the following:
1. Dough name in English.
2. Group Name (Optional): Use the (#) symbol to group similar add-ons (Example: #Dough).
3. Image: Upload images that change dynamically based on the selected option.
4. Status: Enable or disable the add-on using the toggle button.
5. Price: Enter the add-on price or leave it as “0” if there is no extra charge.
6. Barcode / SKU (Optional): Add tracking or inventory codes if available.
7. Click Save.
Note: The above steps must be repeated for each size as a separate sub-product.
How to Create Main Pizza Toppings
• Go to Products → Variants→ Add.
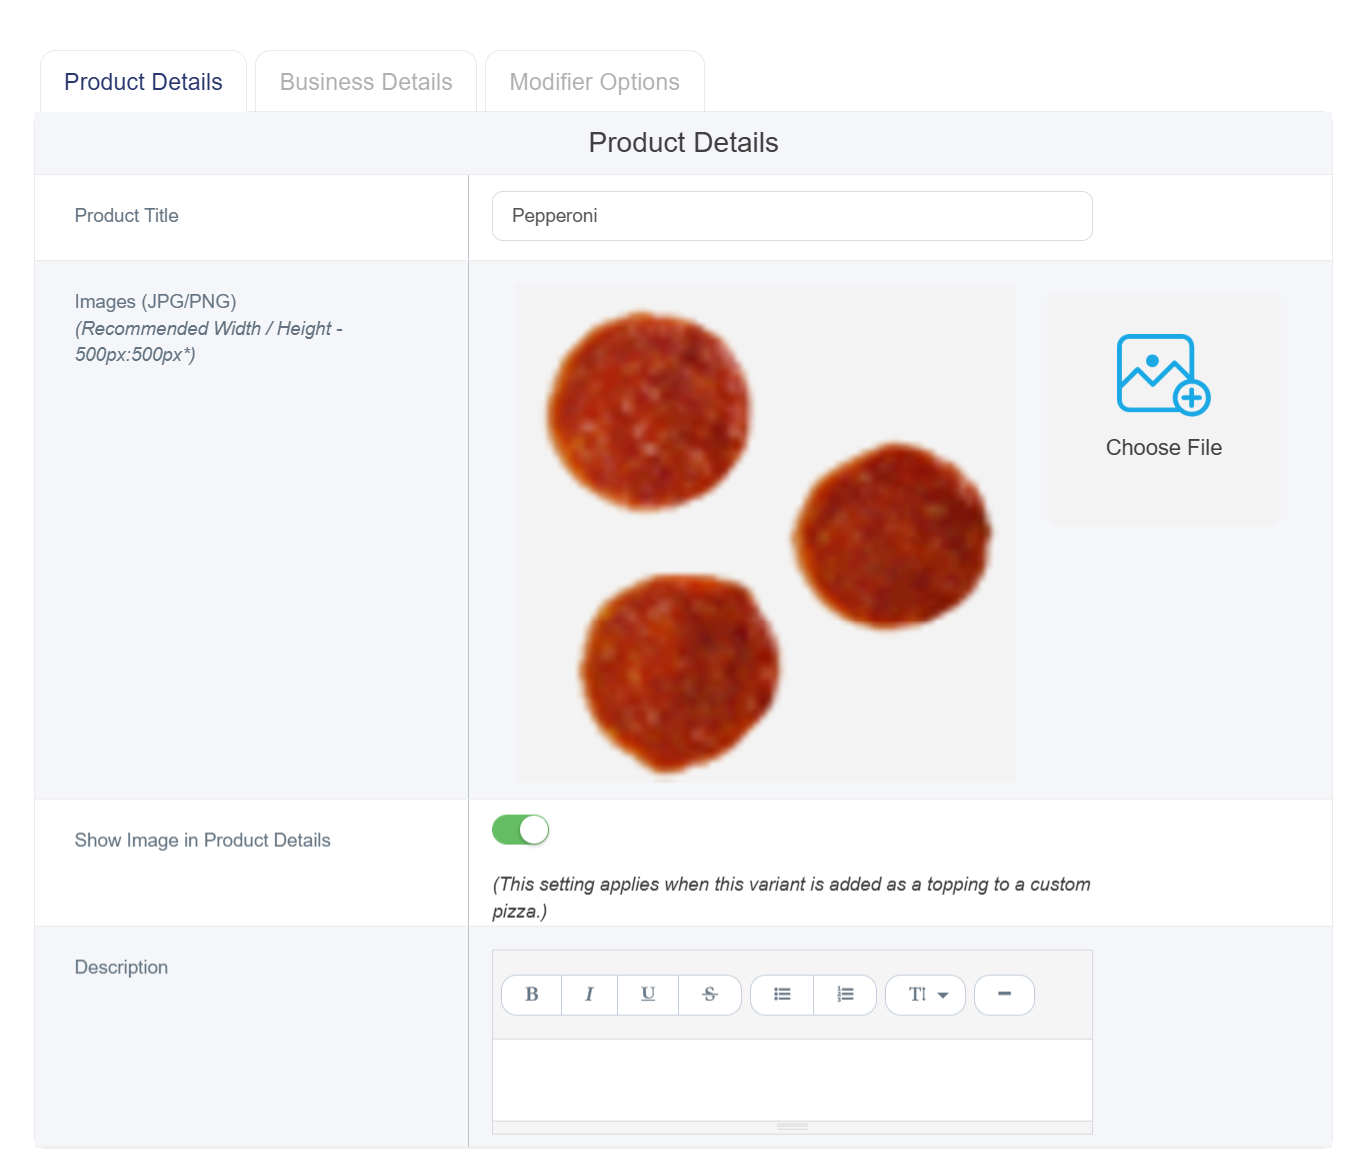
• Fill in Product Details (Toppings)
• Product Name: Enter topping names in English (Pepperoni, Onion, Bell Pepper, etc.).
• Images (JPG/PNG): Upload the topping image with recommended dimensions of 500×500 px.
• Show Image in Product Details: Must be enabled.
• Description: Add a detailed description in both languages.
• Fill in the business details Enter pricing and cost if available.

• Go to Modifiers options to Add Quantities and Layout Display
• Additional Option Title (EN): Enter the option title (Example: “Toppings”).
• Additional Option Type: Select Single Choice.
• Display Layout: Choose Side Toppings Layout to define topping placement and quantity visually.
• Add Topping Options: Click Add above the search box and fill in the following:
• Product name in English.
• Define display direction (Left, Right, or Whole Pizza).
• Define quantity (Light, Regular, or Extra).
• Link direction and quantity options together so matching quantities appear automatically and in an organized manner.
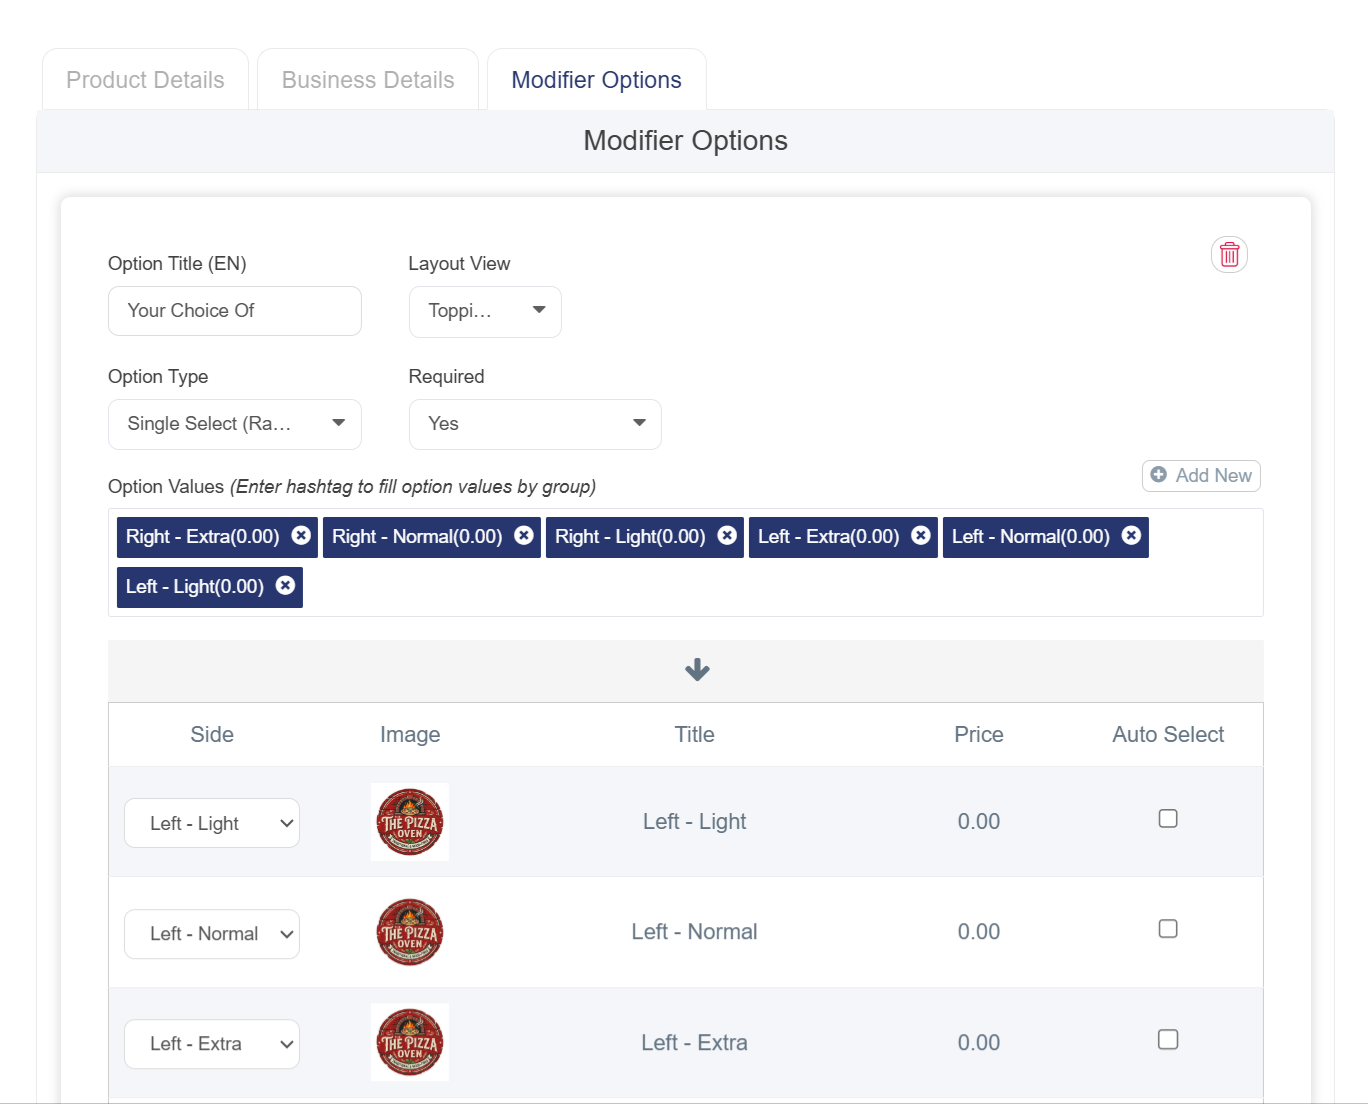
Additional fields:
• Group Name (Optional): Use (#) to group similar toppings.
• Image: Upload images that dynamically change based on selection.
• Status: Enable or disable the add-on.
• Price: Enter additional price or leave “0”.
• Barcode / SKU (Optional): Add tracking or stock codes if available.
• Click Save. To display all modifiers (directions with quantities) in an organized table that includes:
• Direction: Dropdown list to determine topping placement based on predefined directions and quantities.
• Topping image, name, and price.
Note: All pizza toppings are added as sub-products, where each sub-product contains different organized direction and quantity options.
How to Link Sub Products (Sizes & Toppings) with the Main Product (Pizza)
1. From the side menu, click Products.
2. Select Products.
3. Click the blue Add New Product button at the top right.
4. Fill in Product Information
• Product Name (EN ): Enter the pizza name (Chicken Pizza, Veggie Pizza, etc.).
• Category: Select the appropriate category.
• Product Type: Must be set to Advanced Settings.
• Enable Custom Pizza Option:
Instead of displaying variants in the default style (dropdown or regular buttons), this option provides greater control over the display format. It is especially useful for pizza products because customers need to visually see options such as left half / right half / full pizza rather than selecting from text-only lists.
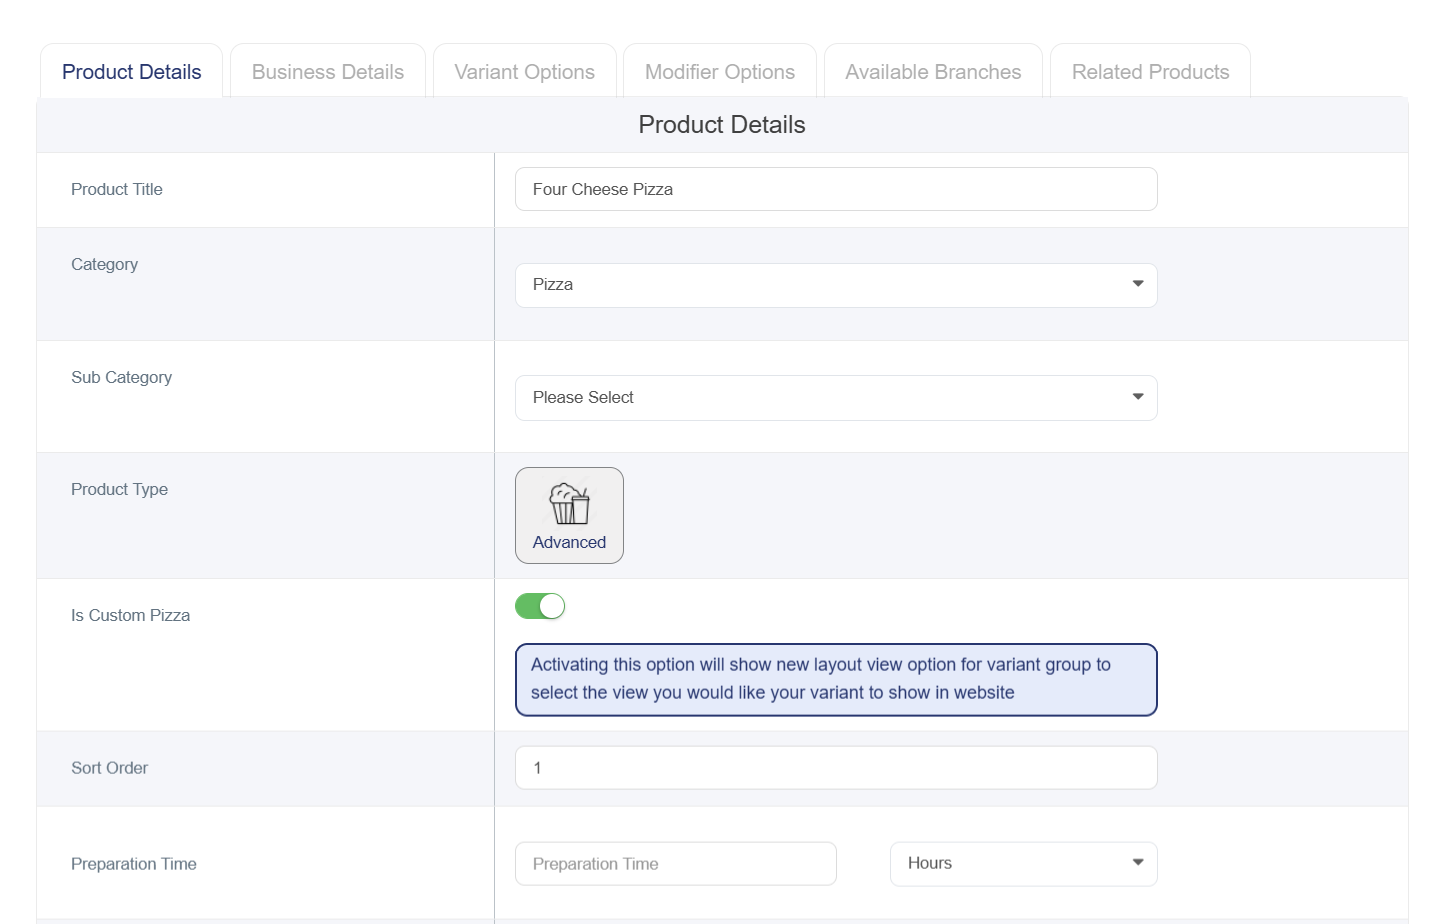
• Product Image: Upload the product image (500×500 px, JPG/JPEG).
• Remaining details such as preparation time, keywords, and descriptions are optional.
5. Fill in Business details
• Sale Price (Required)
• Cost Price (Required), If unavailable, enter “0”
• Purchase Limit
• Barcode
• SKU
• Discount Type (Percentage or Fixed Amount)
• Discount Value
6. Managing variants to link variants (sizes and toppings) to the main product
• First, add the sizes by clicking Add Variant Group.
• Enter option title in both languages (Size / الحجم).
• Display Layout: Select Size Layout for interactive pizza size display.
• Additional Option Type: Must be Single Choice.
• Select size Variant products from the search box and arrange them properly for correct customer display.
7. Click again on “Add Variant Group” to add toppings (vegetables, chicken, etc.), but using a different display style
• Enter option title (Toppings / الإضافات).
• Display Layout: Select Toppings Layout for interactive animated topping display.
• Additional Option Type: Must be Multiple Choice to allow selecting multiple toppings.
• Select topping sub-products from the search box.
8. Modifiers Options
This section is used for additional product options. If not needed, it can be skipped.
9. Available Branches
Enable the option if the product is available in all branches.
10. Save